Compress Images in GitHub Using Imgbot
How to use the ImgBot GitHub app for set-it-and-forget-it image compression.
We’ve all been there: we’re reading an article online and it takes forever to load. To investigate—because we’re developers, after all—we open our developer tools, browse to the Network tab, and notice that the images are uncompressed. Oof. Of course, we would never do that, right?
For the uninitiated, image compression involves shrinking (or “compressing”) the size of a graphics file without degrading a file significantly. This reduces bandwidth and allow sites to load faster. When compressing images, you can choose between:
- Lossless compression, which maintains the same quality as a file before it was compressed (popular with PNG and BMP files)
- Lossy compression, which takes a more aggressive approach (resulting in a smaller size, lost data, and decreased quality). If you’re like me, running a programming blog with simple screenshots, the difference is hard for the naked eye to see. If you’re editing high-quality images on a photography site, however, it’s definitely something to consider.
Image compression is not simple, so unless you specialize in this, you should definitely take advantage of the bevy of tools out there in the community. These tools can come from command-line interfaces (CLIs), editor extensions (I really like the Docs Authoring Pack from Microsoft), or even web sites like TinyPNG (this manual solution does not scale well).
Another approach, of course, would be automating it after-the-fact with a bot. While this gives you less control, you can take a “set it and forget it” mindset and not have to worry about it at all. That’s where I discovered Imgbot, a GitHub bot you can download that scans your GitHub repository for images, compresses them, and then submits a pull request for you to merge into your codebase. It delivers lossless compression by default and is configurable, as well.
Let’s get started with Imgbot and how it can help you manage your repository’s image files.
Download Imgbot
To get started, you’ll need to head over to the Imgbot site to download the bot to your GitHub account. After you pick a plan (free for public open-source repos!) you’ll need GitHub to give Imgbot access to your single repository (or all of them). Once that is installed, Imgbot will create a branch for you and publish a pull request that you can view and then merge, if it’s to your liking.
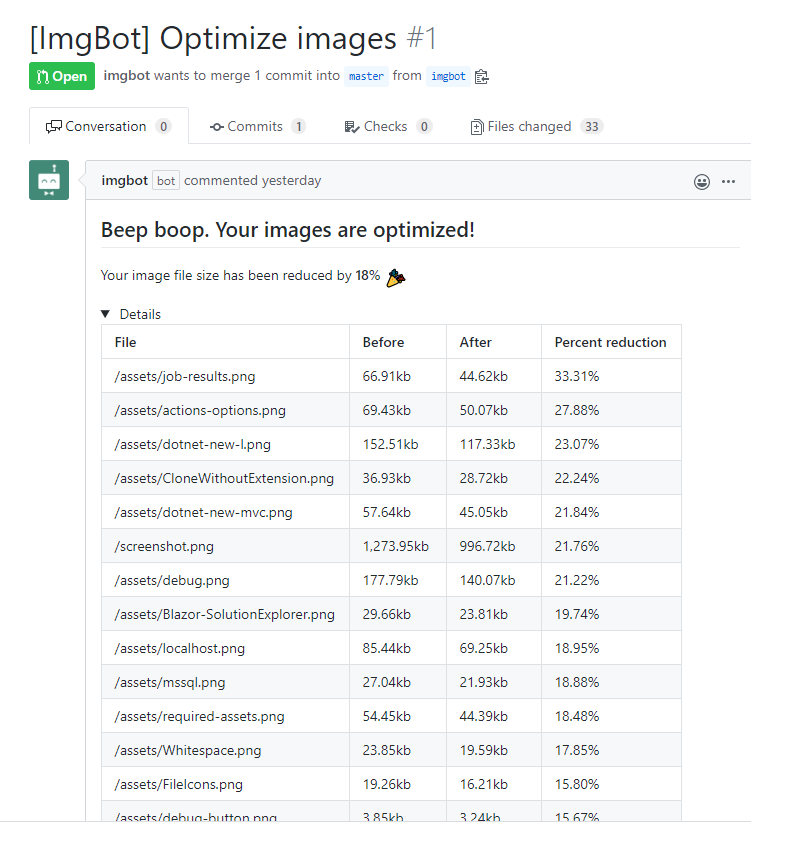
For me, I was able to save about 18% (some were already compressed):
Opt-in to configuration options
If you take a look at the documentation, you can include configuration options for more control. This is done by dropping an .imgbotconfig file at the root of your repository.
You can configure a schedule, files to ignore, “aggressive” compression, wiki compression, and a minimum KB threshold. This sample configuration comes straight from the docs:
{
    "schedule": "daily",
    "ignoredFiles": [
        "*.jpg",
        "image1.png",
        "public/special_images/*",
    ],
    "aggressiveCompression": "true"
    "compressWiki": "true"
}
If you are looking for a hands-off solution to your needs, and are using GitHub, definitely give this solution a shot.