Use Project Tye to simplify your .NET microservice development experience (part 1)
In this post, we explore Project Tye, a new developer tool that simplifies developing .NET microservices and distributed applications.
You don’t have to be operating at Uber scale to understand the complexities of microservices and distributed systems. In many ways, even trying to develop a web app and an API or two can give you headaches when trying to build out a decent local development experience.
In the .NET world, you’re defining ports for multiple projects, hardcoding URLs, and generally walking on egg shells in getting your different services to communicate with one another. If even the slightest configuration detail changes, you feel the pain once again. Of course, you could Docker-ize your environment, but that comes with a steep learning curve. This doesn’t even factor for the complexities of deploying a distributed system to something like Kubernetes.
If you run Kubernetes in production, you must be incredibly intelligent.
— Corey Quinn (@QuinnyPig) April 25, 2019
That’s not a compliment; it’s a requirement.
Project Tye, a new-ish (since May) experimental developer tool, wants to lend a hand. Tye wants to both make development of microservices easier and also help to automate the deployment of .NET applications. It’s big on meeting you where you are—offering a convention-based approach to service discovery and dependencies, and make containerizing of .NET applications automatic, all by using a single configuration file.
We’ll be walking through Project Tye in two separate posts. This post will focus on how Tye can help your local development experience. In the next post, we’ll work on deploying to Kubernetes.
Before we get started, make sure you have the .NET Core 3.1 SDK installed. You won’t get very far if you don’t.
This post covers the following topics.
- Install Tye
- Set up our projects
- Build out a simple API
- Build out web project
- Adding a dependency
- Using a configuration file
- Working with Redis
- Learn more
- Wrapping up
Now, fire up your terminal and let’s get started!
Install Tye
First, we must install Tye. Tye is a global .NET tool.
Execute this from your terminal:
dotnet tool install -g Microsoft.Tye --version "0.4.0-alpha.20371.1"
Because Tye isn’t stable yet, you need to append --version to it with your desired version. Depending when you read this, the version above might not be the latest. If you leave off --version you’ll get a listing of the available current versions.
Set up our projects
Now, we’ll create two projects under a single solution: a web project and an API project. Create a folder for this (or just do a mkdir my-project from the terminal).
We’re going to do a quick app that loads some Marvel characters for us. Execute the following from your newly created folder to create our web app, a Razor pages solution:
dotnet new razor -n marvel-web
And now, without moving folders, create our API project:
dotnet new webapi -n marvel-api
Let’s add both projects to our solution:
dotnet new sln
dotnet sln add marvel-web marvel-api
And now, you can run Tye in the same folder as your new solution file:
tye run
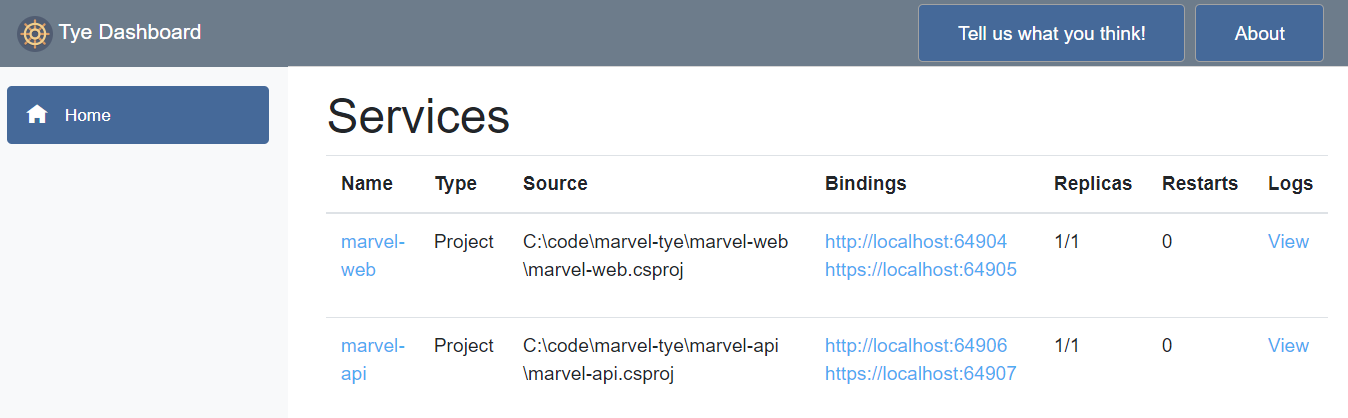
There’s a lot going on here. Tye is building your projects, launching your services, and creating a dashboard for you at http://127.0.0.1:8000. What’s important here: if you do nothing, ASP.NET Core will assign your app’s listening ports randomly, freeing you from the pain of port conflicts.

The main page of the dashboard shows you all your services, your bindings (discoverable URLs), and more.
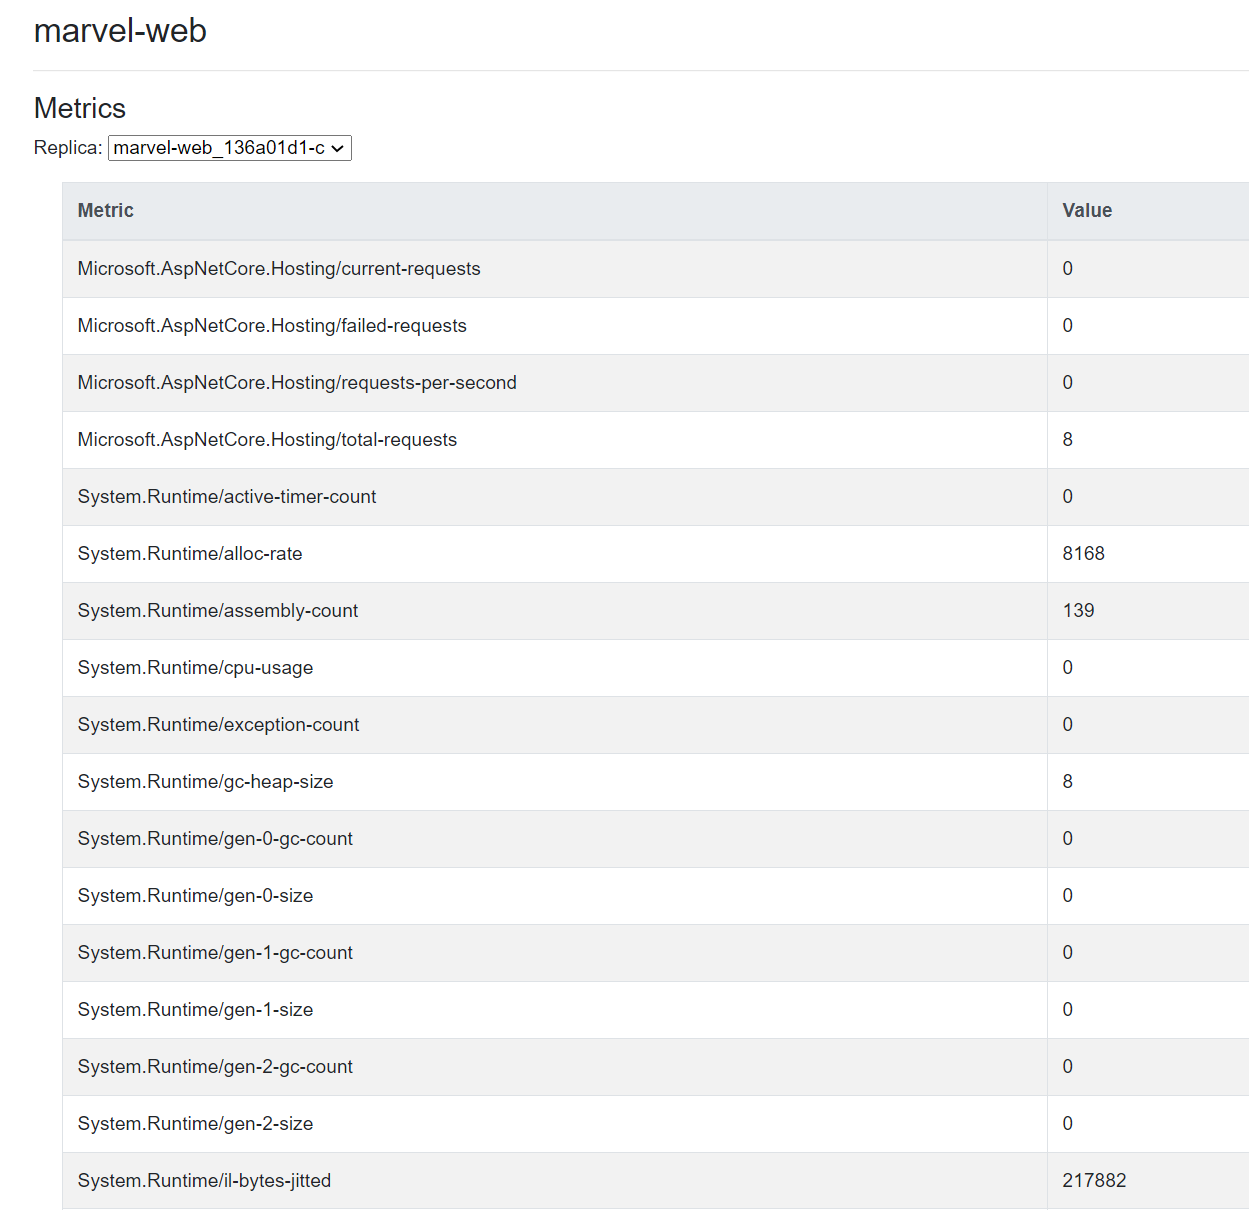
If you click the name of a service (like marvel-web), you can access real-time metrics as it’s running:
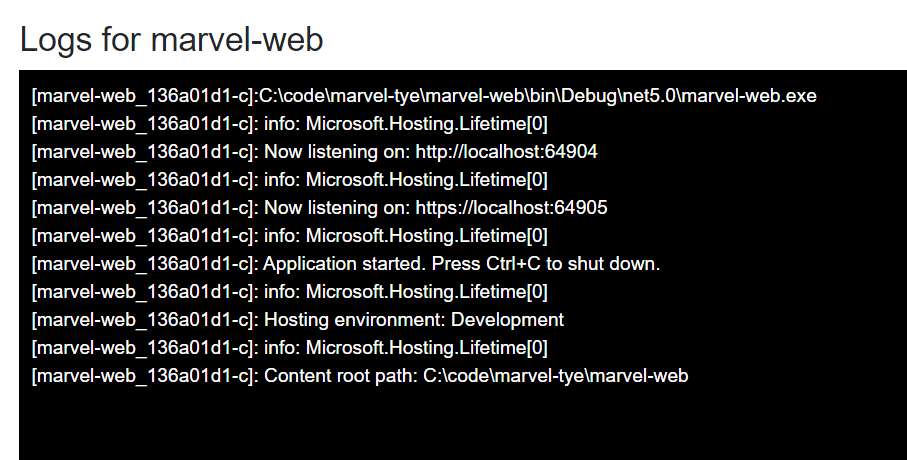
And, of course, what would a dashboard be without logs?
Of course, this is cool but not very exciting. Let’s add some code to our apps.
Build out a simple API
Now, open up the marvel-api project with your favorite editor (like Visual Studio or Visual Studio Code). At the root, rename the WeatherForecast.cs file to Character.cs and replace the contents of the file with this:
namespace marvel_api
{
    public class Character
    {
        public string FirstName { get; set; }
        public string LastName { get; set; }
        public string Status { get; set; }
    }
}
Then, rename the controller to CharactersController.cs. In it, we’ll set up 10 Marvel characters. When we go a get, we’ll retrieve five random ones. (In a little bit, we’ll be able to use this to show off our Redis caching integration.)
using System;
using System.Collections.Generic;
using System.Linq;
using Microsoft.AspNetCore.Mvc;
using Microsoft.Extensions.Logging;

namespace marvel_api.Controllers
{
    [ApiController]
    [Route("[controller]")]
    public class CharactersController : ControllerBase
    {
        private static readonly Character[] Characters = new[]
        {
            new Character() {
                FirstName = "Anthony",
                LastName = "Stark",
                Status = "Deceased"
            },
            new Character()
            {
                FirstName = "Steven",
                LastName = "Rogers",
                Status = "Alive"
            },
            new Character()
            {
                FirstName = "Peter",
                LastName = "Quill",
                Status = "Alive"
            },
            new Character()
            {
                FirstName = "Thor",
                LastName = "Odinson",
                Status = "Alive"
            },
            new Character()
            {
                FirstName = "Natalia",
                LastName = "Romanoff",
                Status = "Deceased"
            },
            new Character()
            {
                FirstName = "T'Challa",
                LastName = null,
                Status = "Alive"
            },
            new Character()
            {
                FirstName = "Bruce",
                LastName = "Banner",
                Status = "Alive"
            },
            new Character()
            {
                FirstName = "Scott",
                LastName = "Lang",
                Status = "Alive"
            },
            new Character()
            {
                FirstName = "Phillip",
                LastName = "Coulson",
                Status = "Deceased"
            },
            new Character()
            {
                FirstName = "Nick",
                LastName = "Fury",
                Status = "Alive"
            }
        };

        private readonly ILogger<CharactersController> _logger;

        public CharactersController(ILogger<CharactersController> logger)
        {
            _logger = logger;
        }

        [HttpGet]
        public IEnumerable<Character> Get()
        {
            var rand = new Random();
            return Characters.OrderBy(x => rand.Next()).Take(5);
        }
    }
}
That should be all we need for the API for the time being. Now, let’s open the marvel-web project.
Build out web project
In this project, also add a Character class (or you could always create a shared project, as it’s identical between the API and web projects):
namespace marvel_web
{
    public class Character
    {
        public string FirstName { get; set; }
        public string LastName { get; set; }
        public string Status { get; set; }
    }
}
Then, create a CharacterClient.cs class that calls our API.
using System.Collections.Generic;
using System.Net.Http;
using System.Text.Json;
using System.Threading.Tasks;

namespace marvel_web
{
    public class CharacterClient
    {
        private readonly HttpClient _client;

        public CharacterClient(HttpClient client)
        {
            _client = client;
        }

        public async Task<List<Character>> GetCharactersAsync()
        {
            var response = await _client.GetAsync("/characters");
            var stream = await response.Content.ReadAsStreamAsync();
            return await JsonSerializer.DeserializeAsync<List<Character>>(stream);
        }
    }
}
In the Index page model, at Index.cshtml.cs, add a Characters property and change OnGet to call the client we created:
using System.Collections.Generic;
using System.Threading.Tasks;
using Microsoft.AspNetCore.Mvc;
using Microsoft.AspNetCore.Mvc.RazorPages;
using Microsoft.Extensions.Logging;

namespace marvel_web.Pages
{
    public class IndexModel : PageModel
    {
        private readonly ILogger<IndexModel> _logger;

        public IndexModel(ILogger<IndexModel> logger)
        {
            _logger = logger;
        }

        public List<Character> Characters { get; set; }

        public async Task OnGet([FromServices] CharacterClient client)
        {
            Characters = await client.GetCharactersAsync();
        }
    }
}
Next, open Index.cshtml to lay out our table:
@page
@model IndexModel

<div class="text-center">
    <h1 class="display-4">Random Marvel Characters</h1>
</div>

<table class="table">
    <thead>
        <tr>
            <th>First Name</th>
            <th>Last Name</th>
            <th>Status</th>
        </tr>
    </thead>
    <tbody>
        @foreach (var character in @Model.Characters)
        {
            <tr>
                <td>@character.FirstName</td>
                <td>@character.LastName</td>
                <td>@character.Status</td>
            </tr>
        }
    </tbody>
</table>
You might be thinking: OK, how does my web app communicate with my API?
That magic will be done through the Microsoft.Tye.Extensions.Configuration NuGet package, that you can install from either the dotnet CLI or the NuGet Package Manager in Visual Studio itself. You may already be familiar with the Microsoft.Extensions.Configuration system that ships with any ASP.NET Core project. The Tye package provides Tye-specific extension methods on top of Microsoft.Extensions.Configuration.
Open up Startup.cs and change ConfigureServices to this:
public void ConfigureServices(IServiceCollection services)
{
    services.AddRazorPages();

    services.AddHttpClient<CharacterClient>(client =>
    {
        client.BaseAddress = Configuration.GetServiceUri("marvel-api");
    });
}
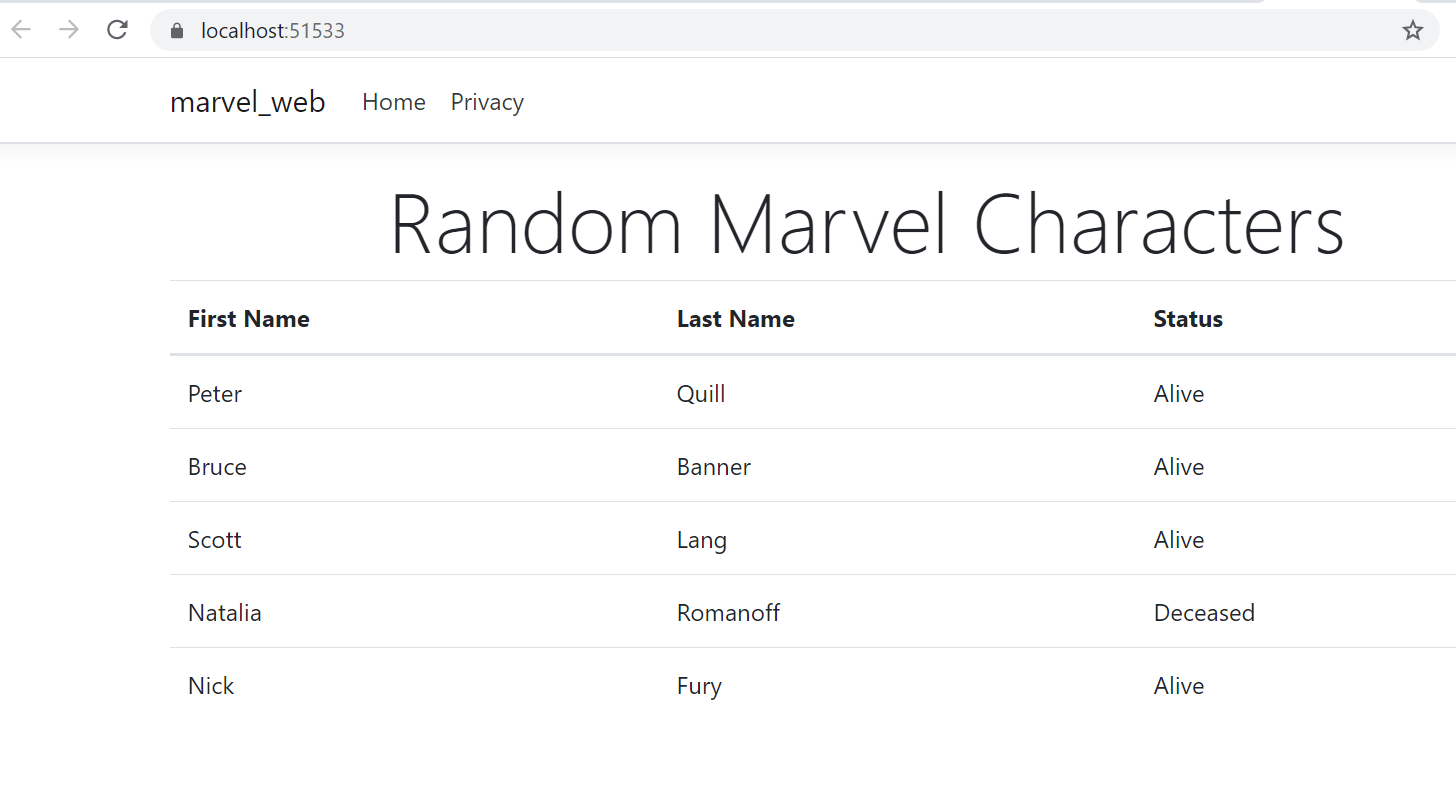
This is where the service discovery takes place. (Feel free to geek out on how Tye does service discovery.) What a world—no port numbers, no brittle configuration. It just works. Execute tye run now—and go to the web project. (Also, if you click over to the logs, it’s a lot more insightful now.)
Adding a dependency
At this point, things are great—we’ve been able to take a better look at code we manage and write. In the real world, that is rarely the case. You use libraries and dependencies you don’t manage—as a matter of fact, the whole point is to have the complexity managed for you, but how can Tye discover these dependencies?
Using a configuration file
Now that things are getting a little more involved, it’d be a good time to ask you to run tye init. When you do this, Tye drops an optional configuration file (tye.yaml) that allows you to customize your settings. When I did this, Tye populated the file with information about my current setup. (Tye provides documentation on the schema, as well.)
# tye application configuration file
# read all about it at https://github.com/dotnet/tye
#
# when you've given us a try, we'd love to know what you think:
#    https://aka.ms/AA7q20u
#
name: marvel-tye
services:
- name: marvel-web
  project: marvel-web/marvel-web.csproj
- name: marvel-api
  project: marvel-api/marvel-api.csproj
Working with Redis
To see how Tye works with external dependencies, we’ll add a Redis cache (thanks to the announcement for the inspiration). First, we’ll refactor our API’s Get method to use our IDistributedCache interface.
//using Microsoft.Extensions.Caching.Distributed;
//using System.Text.Json;

[HttpGet]
public async Task<string> Get([FromServices]IDistributedCache cache)
{
    var characters = await cache.GetStringAsync("characters");

    if (characters == null)
    {
        var rand = new Random();
        var randomCharacters = Characters.OrderBy(x => rand.Next()).Take(5);

        characters = JsonSerializer.Serialize(randomCharacters);

        await cache.SetStringAsync("characters", characters, new DistributedCacheEntryOptions
        {
            AbsoluteExpirationRelativeToNow = TimeSpan.FromSeconds(3)
        });
    }

    return characters;
}
For our API to use the IDistributedCache, we need to inject it in our Startup class in our API. After you fetch the Microsoft.Extensions.Caching.StackExchangeRedis NuGet package, do this in Startup.cs:
public void ConfigureServices(IServiceCollection services)
{
    services.AddControllers();

    services.AddStackExchangeRedisCache(options =>
    {
      options.Configuration = Configuration.GetConnectionString("redis");
    });
}
Again, admire the beauty of no port hardcoding. Instead, the Tye host binds redis to the configuration string for our redis service. Next, let’s update our new configuration file to use redis. As in the announcement, we can add a redis-cli service to monitor redis traffic.
name: marvel-tye
services:
- name: marvel-web
  project: marvel-web/marvel-web.csproj
- name: marvel-api
  project: marvel-api/marvel-api.csproj
- name: redis
  image: redis
  bindings:
  - port: 6379
    connectionString: "${host}:${port}"
- name: redis-cli
  image: redis
  args: "redis-cli -h redis MONITOR"
Now, if you do a tye run, pull up the dashboard and note the addition of our redis components. If you go to the web project, we should see new randomized characters every three seconds.
Learn more
There are so many possibilities with Tye—head on over to the GitHub repository to learn more. There’s tons of samples there to get you started, including apps with Angular, MongoDB, nginx, Azure Functions, and much more. And if it’s missing something, let me team know using a GitHub issue or the feedback button in the Tye dashboard.
Wrapping up
In this post, we introduced Project Tye and talked about how it can improve your experience when building .NET distributed applications. We installed Tye, toured the dashboard, and built out a simple web and API project. We showed how easy service discovery is with Tye, and also added a dependency.
In the next post, we’ll talk about how Tye can assist you with deploying our app to Kubernetes. Stay tuned!