Use Project Tye to simplify your .NET microservice development experience (part 2)
In this post, we use Project Tye to deploy our application to Kubernetes.
In the last post, I introduced Project Tye: what it is, the Blazor-powered dashboard, monitoring services, adding dependencies, and working with the optional configuration file. In my opinion, the content of that post alone made Tye worth it, but a huge use case is cutting through the complexities of containerized applications and being able to simplify deployment scenarios.
You’re probably aware of the reputation of Kubernetes of being extremely complex. My experience with it is that of many: bewildering at first, but ultimately beneficial. For many of us, we want to take advantage of Kubernetes without having to worry about being an expert, or spending hours (or days) on configuration.
In this post, we’re going to look at how Project Tye can help us deploy our containerized application to Kubernetes effortlessly. As in the last post, fire up your favorite terminal and let’s get started.
Docker is a technology that allows you to deploy and run applications in containers. Kubernetes is a system that allows you to manage containerized apps across nodes. If this isn’t making sense, hit up the Docker and Kubernetes documentation to learn more. An in-depth discussion of Kubernetes and Docker is outside the scope of this post.
Before we get started, make sure you have the .NET Core 3.1 SDK installed. You won’t get very far if you don’t.
This post covers the following topics.
- Prerequisites before starting
- Create ACR and AKS instances
- Deploy our dependency ourselves
- Our first deploy
- Port-forward to access our application
- Clean up
- Wrapping up
- References
Prerequisites before starting
Fun fact: if you want to get up and running with Tye quickly, you can execute tye run and not have to worry about containerizing your apps. In the last post, to keep things simple, that’s exactly what we did. (If we wanted, we could have executed tye build to build containers for our application.)
Now that we know enough to be dangerous, it’s time to get real and utilize containers for our app. While Project Tye will do a lot of the heavy lifting for us, we still need to get the pieces in place for Tye to do its magic.
Before deploying with Project Tye, you need the following:
- Docker installed on your system
- A registry to store containers—Docker uses DockerHub by default, or you could use something like Azure Container Registry (we’ll be doing ACR)
- Some sort of Kubernetes cluster (AKS, Kubernetes in Docker, Minikube, and so on)
We will perform the last two steps now.
Create ACR and AKS instances
We’ll need some sort of container registry and Kubernetes cluster for Tye to use. I’ll be using the Azure Container Registry (ACR) and Azure Kubernetes Service (AKS), both Azure services. Here’s how to set that up. (If you’ve got a registry and cluster all ready, feel free to skip past this section.)
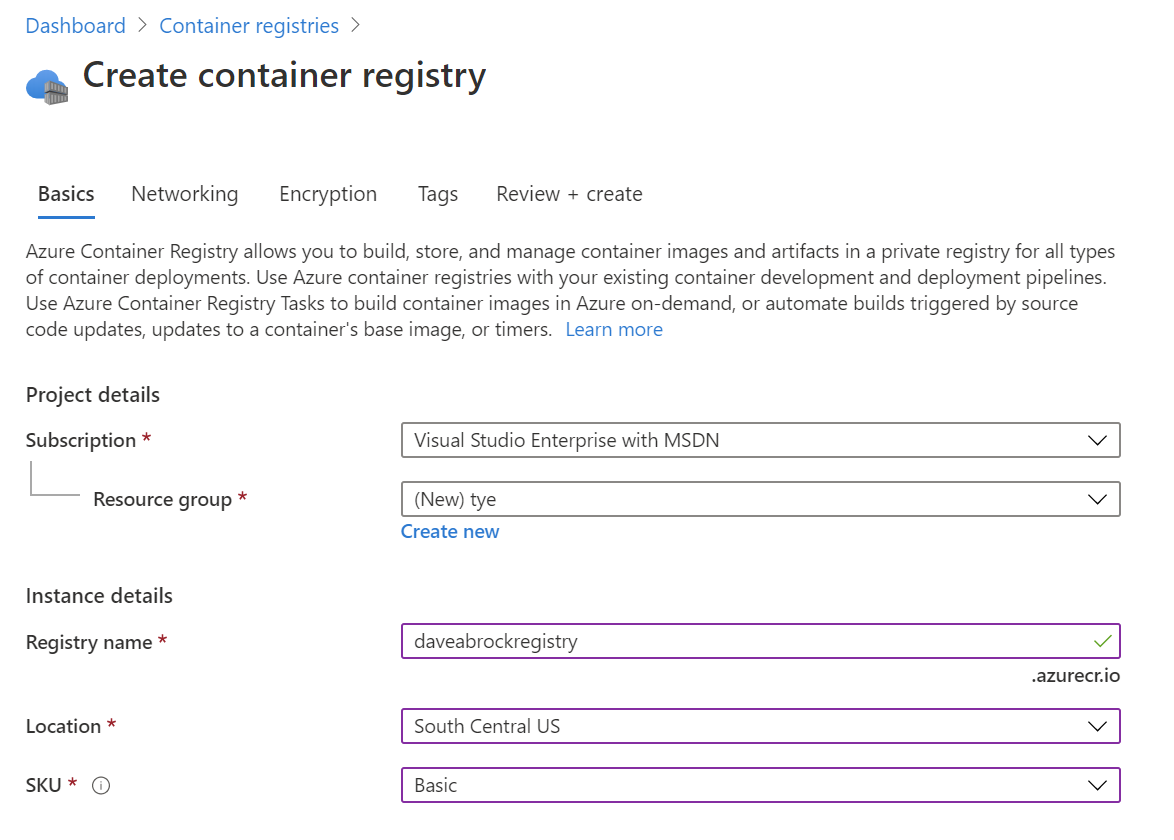
From the Azure Portal, search for “container” and click Container registries. Then, click +Add to create a new registry.
From the Create container registry screen, enter a subscription, resource group, unique registry name, location, and SKU. The Basic SKU should be fine for our purposes. Once complete, click Review + Create, then Create.

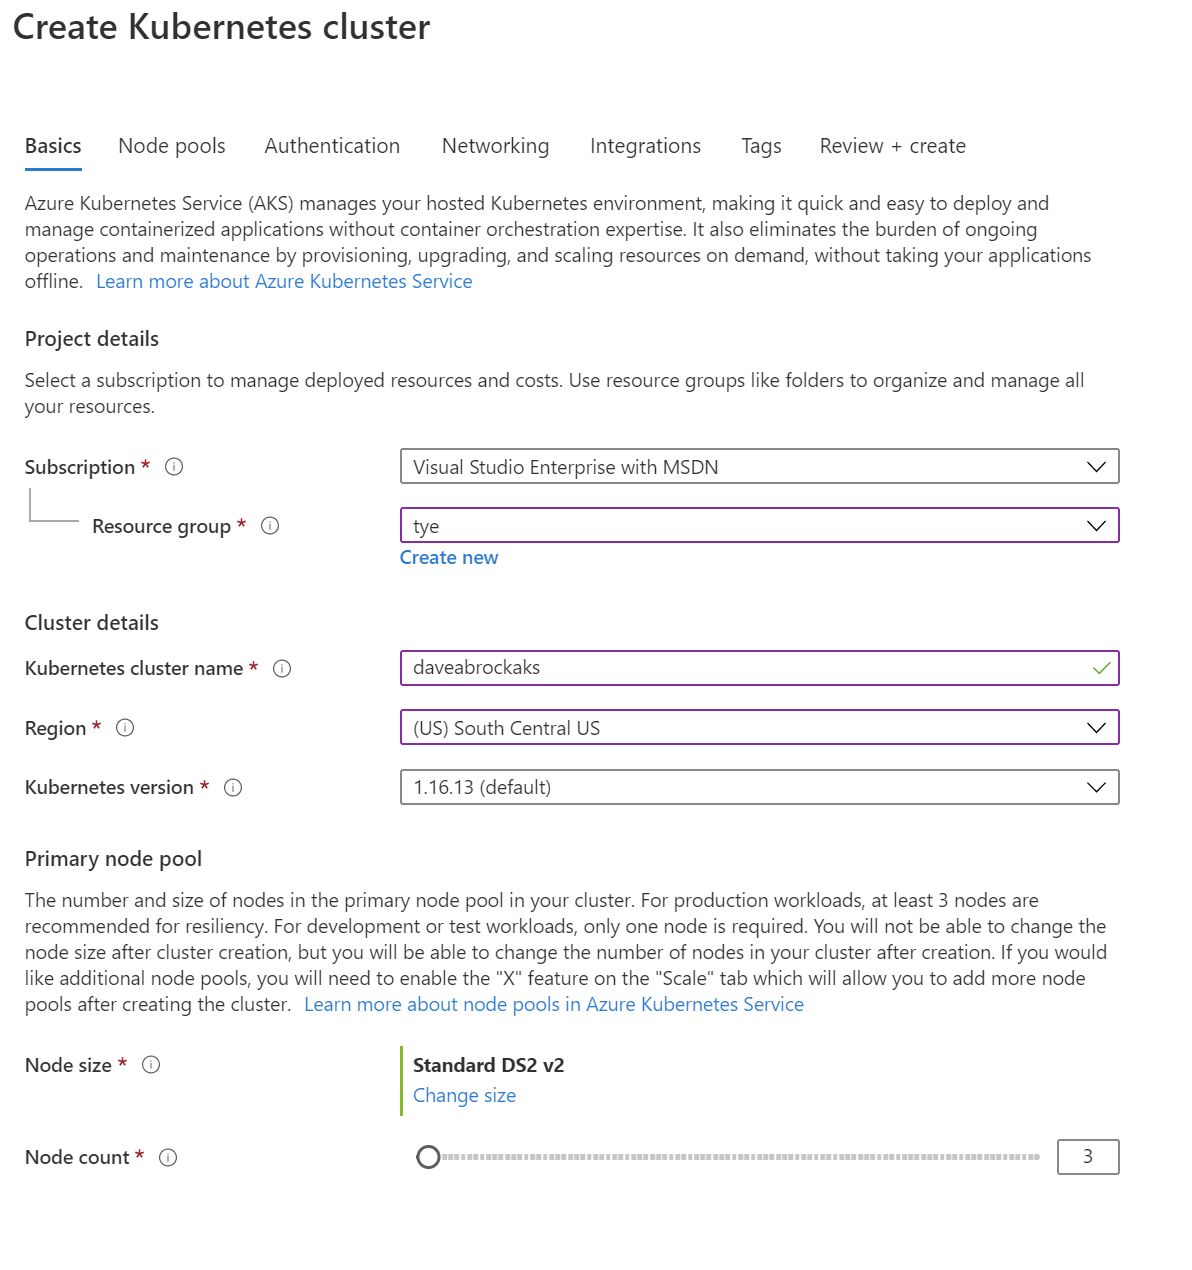
Now, we’re ready to create our AKS instance. Again from the search bar at the top of the Azure Portal screen: search for “aks”, then click Kubernetes services. Fill out a subscription, resource group, cluster name, accept and accept the rest of the defaults.

Don’t create the resource yet!
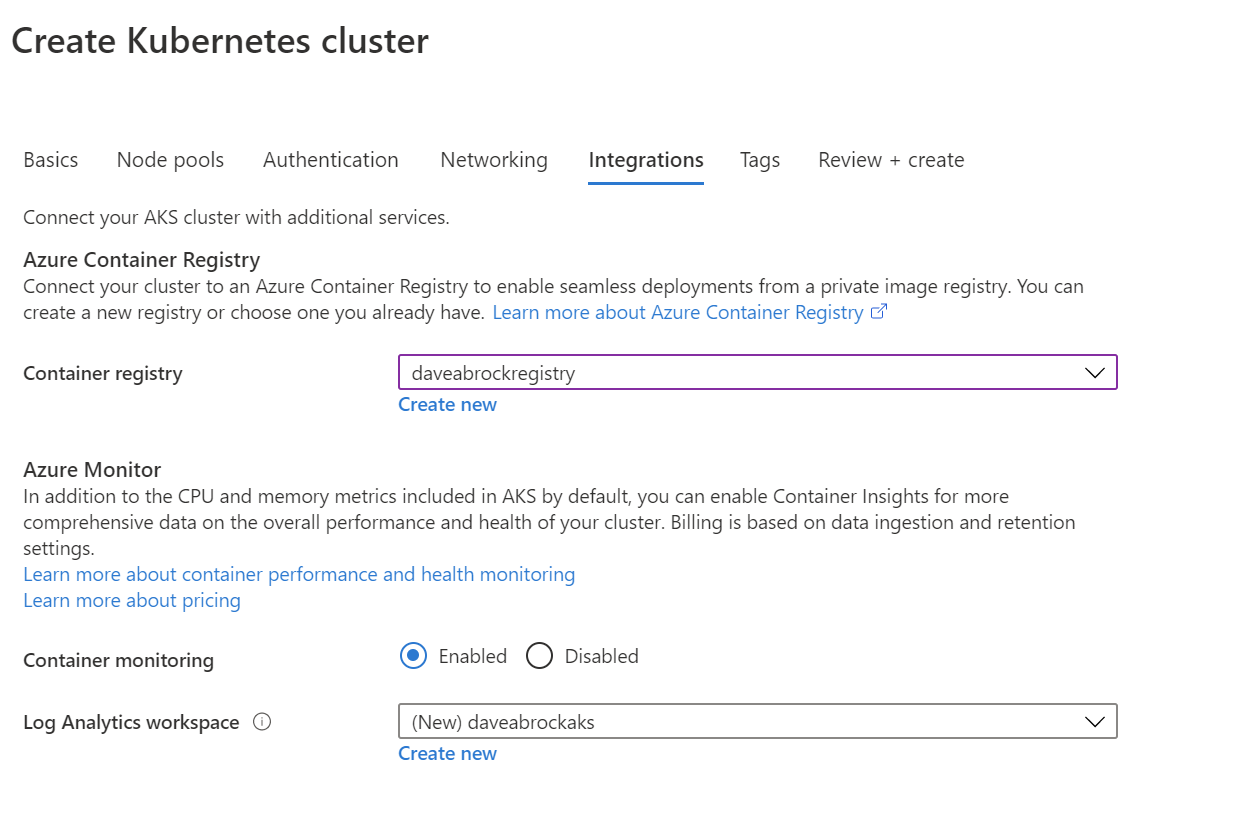
Next, pop on over to the Integrations tab. This is important: select the registry you just created from the drop-down list, then click Review + Create, then Create. It’ll take a few minutes to complete resource creation.

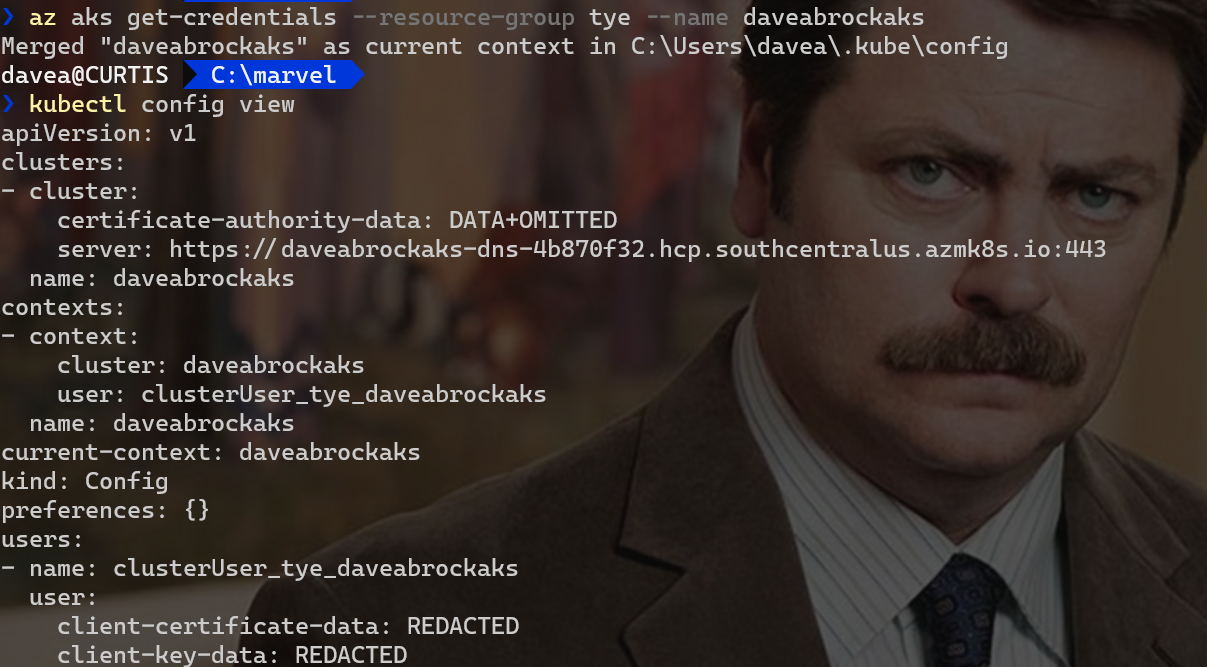
The Kubernetes command-line tool, kubectl, needs to know about the cluster. To do so, call the Azure CLI from your local machine (you first may need to call az login, or az acr login --name {registry_name}, I had to do the latter).
az aks get-credentials --resource-group {resource-group} --name {cluster-name}
Once that completes, you can execute kubectl config view to view and verify your local Kubernetes configuration. Here’s both commands in one handy screenshot.

Deploy our dependency ourselves
Remember our Redis dependency from the last post? We will have to deploy this ourselves. Why doesn’t Tye do this for us? This is by design. Your dependencies are your dependencies, likely already configured with ports and connection strings. The assumption is that these are already set up by you, so Tye doesn’t need to make assumptions or create a new instance for you.
Borrowing from the Tye introductory post from Microsoft, we’ll take the existing configuration from Tye’s GitHub using kubectl apply:
kubectl apply -f https://raw.githubusercontent.com/dotnet/tye/master/docs/tutorials/hello-tye/redis.yaml
Our first deploy
We’re ready to try out our first deploy!
Before we run tye deploy it’s important to note that Tye will use your existing credentials to push to Docker and access your Kubernetes clusters—so Tye will be using your existing context if you do nothing.
That is done by, you guessed it, tye deploy. This first time, you’ll need to append the --interactive flag. Using this, Tye will request a few things.
- Container Registry - enter myregistry.azurecr.io (if you are using ACR) or your user name for dockerhub
- Connection string for redis - enter
redis:6379, assuming you used the same deploy (if not, use a specified port)
For this to work, I had to do a docker login first, but your experience may vary.
Using the --interactive flag is a one-time step for your distributed application so that Tye is aware of your registry and for Tye to register the Kubernetes secret for our external dependency (Redis).
After execution, your terminal will see a lot of logged activity. Here’s the gist of what’s going on.
- Publishes your projects
- Builds Docker images for each projects and push them to the registry
- Pulls images from your cluster
- Creates manifests and service definitions
- Generates Kubernetes
DeploymentandServicefor each project, and applies them to our context
You can confirm everything by executing kubectl get pods from your terminal. Here’s what I see:
NAME                          READY   STATUS    RESTARTS   AGE
marvel-api-6d479df46d-hlmrp   1/1     Running   0          9m
marvel-web-744dbb6bf8-98d4g   1/1     Running   0          9m
redis-58897bf8c-p72tz         1/1     Running   0          13m
Microsoft has noted that because Tye does not automatically enable TLS in the cluster, traffic occurs over HTTP. The team might look to enable TLS in the future.
By the way, you can include your registry in your tye.yaml file to prevent the --interactive step, if needed. It’s as simple as including this in your file:
registry: {my-registry-name}
This customization is ideal for CI/CD scenarios.
Port-forward to access our application
We are deployed! So, how do we access our app? We’ll want to access the web app from outside of our Kubernetes cluster. To do so, we’ll use port-forwarding from the Kubernetes CLI:
kubectl port-forward svc/marvel-web 5000:80
We’re in business! Project Tye deployed our app to AKS for us. If you browse to http://localhost:5000, our trusty app should be up and running! Feel free to check out Application Insights for your cluster to see it in action.
In a world where “simple” and “Kubernetes” hardly ever share the same sentence, Project Tye was able to do it with just a tye.yaml file. Tye was able to set up all the environment variables to us, for all our services to communicate with each other, without any intervention from us.
Clean up
If you’d like to clean up after trying this out, here’s what to do:
- Remove Tye deployment - run
tye undeploy(runtye undeploy --what-iffor a preview) - Delete Redis deployment - run
kubectl delete deployment/redis svc/redis - Delete AKS cluster - from the Azure CLI, run
az aks delete --name {my-cluster} --resource-group {my-resource-group}
Wrapping up
In this post, we created Azure Container Registry (ACR) and Azure Kubernetes Services (AKS) instances, deployed an external dependency, and deployed our app to Kubernetes from Project Tye. Then, we used port-forwarding to provide the ability to run our app locally outside of our cluster.
I hope you enjoyed this introductory two-part series on Project Tye. I realize it was simple with just two applications and a dependency—this was intentional. As Tye evolves, I’d like to dig a little deeper on a complex real-world app and put debugging through its paces (which is still being worked on). It’s early but hopefully you can already see that this powerful tool takes a lot of headaches out of developing microservices in .NET, which is all you can ask.
References
Some content that was helpful in writing this post, and some supplementary information that might assist you:
- Project Tye (GitHub repo)
- Tye releases
- Tye samples
- Recipes
- Introducing Project Tye (Microsoft blog post)
- Developing and Deploying Microservices with ‘Tye’ (.NET Conf - Focus on Microservices)
- Project Tye – easier development with .NET for Kubernetes (Christian Nagel)
- Kubernetes docs
- Docker docs


