How To Not Hate JavaScript
Let's improve our relationship with JavaScript by reinforcing some core concepts.
“I hate JavaScript.”
Let’s get real: we’ve all said it. When we say these words in anger, what do we really hate about JavaScript?
It is node_modules? Is it Webpack? Is it the convoluted ecosystem which seems to change every three months? Is it npm or yarn, or package dependencies in general? Is it the lack of a standard build system or a standard library? Is it the fact that it’s dynamically and loosely typed, with almost no restrictions? Is it the inherent design flaws? The insecure nature? The pedantic framework wars?
While these are all valid gripes, let’s think about it another way: is a big reason why we sometimes say we hate JavaScript because we don’t understand its core concepts well enough?
I’ve experienced this journey first-hand. As a back-end C# developer, I was arrogant: with my years of experience as a software engineer, I thought with a lot of the constructs being similar, it wouldn’t take me long to master. JavaScript is so different from any other language, with intricacies all of its own—it took me years to understand this.
I got up to speed, rushed to use other frameworks, embraced TypeScript (as you should!), but still couldn’t stand JavaScript. My problem: I never took the time to learn and understand concepts where, if you don’t know or understand them, you’ll spend hours (sometimes days) on a bug, fix it thanks to some luck, and never truly understand the source of the problem—and, as a result, be subjected to an infinite loop of JavaScript incompetence.
After I began to understand why I despised JavaScript, I took action to learn more. In the last year or two, after filling in some gaps, I find JavaScript to be a somewhat pleasant experience. I’m not saying its perfect—what is?—but I understand why things are the way they are.
So, allow me to share with you a few things that, once I learned them, made me understand JavaScript so much better and made my experience a lot less frustrating. To you, some might be “you didn’t know this?” and some might be difficult to grasp—and that’s OK. Wherever you are in your journey, I hope this helps you.
By the end, if you dig deep into these concepts my hope is that you can appreciate and understand JavaScript a little more, for the good and the bad.
This post covers the following topics.
- Understand execution context
- The global context
- Functional execution context
- Know the event loop
- Know
asyncandawait - Know the big three array methods
- .map()
- .filter()
- .reduce()
- When to use
map,filter, andreduce, in one sentence - Understand that arrow functions aren’t just for conciseness
- Wrap up
Understand execution context
To completely understand and work with advanced JavaScript concepts like closures, scopes, and hoisting, you need to understand how JavaScript’s execution contexts work. If you ever have trouble understanding why a variable is undefined when you do not want it to be, the execution context is a good place to start.
When talking about execution context, we need to understand two things: the global context and the function execution context.
The global context
The global context is the default context, where code resides that does not sit inside a function. The context contains two items at the beginning before you run any code at all: the global object (which is window in browser-based JS or global for Node.js) and the this variable—which is set to the global object.
The global context also sets up space in memory for our variables and functions, and assigns variables to undefined while putting function declarations in memory. This takes place before any code is run, and is called the creation phase.
If you look at this code:
var firstName = 'Dave';
var lastName = 'Brock';
var occupation = 'Software Developer';

function getDetails() {
    return {
        firstName: firstName,
        lastName: lastName,
        occupation: occupation
    };
};
My return object could use the short-hand object syntax, but I’m doing it this way for clarity.
After the code runs—we are now in the execution phase—the JS engine executes the code line by line and assigns variables to the values you specified. For example, if you log a variable between creation and execution, you should get back undefined.
console.log(firstName); // undefined
console.log(lastName); // undefined

var firstName = 'Dave';
var lastName = 'Brock';
var occupation = 'Software Developer';

function getDetails() {
    return {
        firstName: firstName,
        lastName: lastName,
        occupation: occupation
    };
};
This is what hoisting is: assigning variables undefined while being created. Our industry is full of using fancy words for such simple things. I hope this clears things up.
Functional execution context
The other context you need to know is the functional context (for, of course, functions). This is created whenever functions are called (or invoked, to be fancy). We’ll have one for every function, and since the global object (and execution context) are in place it doesn’t need to create it again. This context creates an arguments object and then, just like the global context, creates a this object, sets up space for variables and functions, and sets variables to undefined and puts any declarations in memory.
When a function is invoked, a new functional execution context is created for it and added to the call stack. After execution completes, it gets removed (popped).
For more details, check out Tyler McGinnis’s wonderful article.
Know the event loop
If I can pick one thing I wish I knew when I started working on JavaScript, it’s the event loop. How I would have loved for someone to find my bug as a junior engineer, pull me aside, and say: “Hey, stop what you’re doing and take the rest of the day to learn the event loop. Thank me later.”
Because the JavaScript engine is single-threaded, it’s vitally important that you understand this. Being single-threaded is actually not the worst thing, as it avoids a lot of concurrency issues—but you still need to understand how not to block the single thread you have at your disposal.
Here’s the job and purpose of the event loop in JavaScript: it looks at the call stack and runs anything that is currently on the stack. If it’s empty, it looks at the message queue, and pushes its contents onto the stack in order.
Because JS is single-threaded, it has one call stack. But what happens if something on the stack is taking forever and blocks things? For that we have browser APIs—we can offload things like setTimeout and DOM APIs to give the illusion we’re concurrent.
A common example: how is this code processed?
setTimeout(() => {
    console.log('oh hi!')
}, 5000)
When this happens, we call out to a browser API that is NOT part of the JavaScript runtime. When the five seconds completes, the API lets JavaScript know, and an item is added to the message queue, which is first in, first out. When the call stack is empty, JS takes the message, places it on the stack, and runs it.
This is an important distinction to make: when you invoke setTimeout you are not saying it’ll return in five seconds—you’re saying that is the minimum amount of time it will return, depending on what else is in the call stack.
Your knowledge of the call stack is vital as your code becomes more complex. These concepts weren’t clear until I watched the Philip Roberts talk, which is on YouTube. In my opinion, it’s well worth your time.
Know async and await
If you’re a regular reader here, you’re likely a C# developer—so I don’t need to tell you about how awesome the async and await paradigm is. The excitement is ever-present in the JavaScript community as well. From callbacks, to promises, and now async await, the JS async capabilities have come a long way.
However, like in C#, don’t let its simple syntax fool you into thinking you don’t have to be aware of how it all works. You can view async and await as a wrapper around the Promise infrastructure.
When you do something like this…
function sayHiToDave() { return "Hi, Dave" };
… if you execute it in your console, you’ll get back Hi, Dave. As you should.
Now, if you make it async:
function async sayHiToDave() { return "Hi, Dave" };
If you invoke this in your dev tools, you’ll see it returns a Promise. The return values will always be converted to promises.
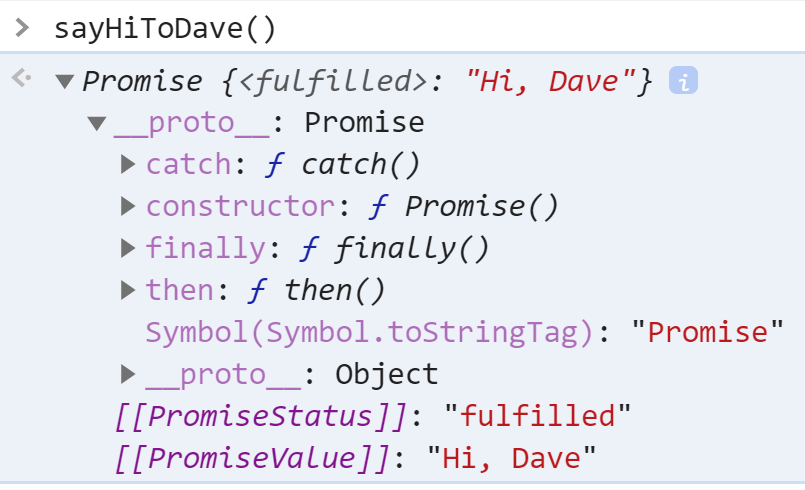
So, to consume the return value, you would do something like:
sayHiToDave().then(console.log);
Of course, what’s the fun of async without the await? Await avoids all this .then() work. It’ll pause on the line until the promise is completed or fulfilled, then will return the value you wanted.
So just understand async and await is mostly syntactic sugar over Promises, saving you from the .then() chaining they are famous for.
However, know the downsides: async/await looks synchronous. In fact, await blocks code execution until fulfillment time. Other tasks can run, but your code is blocked. If you are await’ing a lot of things, you can face a performance hit as each await is waiting for the previous one.
If this sounds like something you face, the wonderful MDN async/await article says: you can offset this by storing Promise objects in variables, then awaiting them all.
As with anything, know the drawbacks and try not to use async/await without knowing what’s really happening.
Know the big three array methods
There are so many array methods in JavaScript. For most of them, you should be able to reference the docs and apply your knowledge. But the three you must truly master and wrap your mind around are map(), filter(), and reduce(). These are used so frequently and are so important. They will take you far.
.map()
A lot of us know this one, but as a recap: the map() method creates a new array based on a previous array. Here, I would just like to send city names to a new array. The important thing to note with these methods is that a new array is created (and it does not update your existing array).
const cities = [
  { id: 1, name: 'Chicago', state: 'IL', population: 2693976 },
  { id: 2, name: 'Houston', state: 'TX', population: 2320268 },
  { id: 3, name: 'Minneapolis', state: 'MN', population: 453403 },
  { id: 4, name: 'Madison', state: 'WI', population: 258054 },
  { id: 5, name: 'San Antonio', state: 'TX', population: 1327407 }
]

// ['Chicago', 'Houston', 'Minneapolis', 'Madison', 'San Antonio']
const justCityNames = cities.map(cities => cities.name);
.filter()
To take it a step further, we can use filter() to create a new array based on some criteria. For example, let’s get back all cities with a population more than 1 million people.
const cities = [
  { id: 1, name: 'Chicago', state: 'IL', population: 2693976 },
  { id: 2, name: 'Houston', state: 'TX', population: 2320268 },
  { id: 3, name: 'Minneapolis', state: 'MN', population: 453403 },
  { id: 4, name: 'Madison', state: 'WI', population: 258054 },
  { id: 5, name: 'San Antonio', state: 'TX', population: 1327407 }
]

// ['Chicago', 'Houston', 'Minneapolis', 'Madison', 'San Antonio']
const bigCities = cities.filter(city => city.population > 1000000);
.reduce()
To be honest, .map and .filter aren’t too difficult to grasp—it’s reduce() that will hold the key to your glory (and your frustration, if you don’t understand it). While methods like map() and filter() make you another array, reduce() has greater ambitions. It says: “you give me an array, and I’ll transform it for you to whatever you want.” This can be an object, an array, an int, a calculation. Anything.
Let’s say we want to add up total population for all our cities using an add function:
function add(array) {
    return array.reduce((total, num) => {
        return total + num
    }, 0);
};

const cities = [
  { id: 1, name: 'Chicago', state: 'IL', population: 2693976 },
  { id: 2, name: 'Houston', state: 'TX', population: 2320268 },
  { id: 3, name: 'Minneapolis', state: 'MN', population: 453403 },
  { id: 4, name: 'Madison', state: 'WI', population: 258054 },
  { id: 5, name: 'San Antonio', state: 'TX', population: 1327407 }
]

const cityPopulations = cities.map(cities => cities.population);
const totalPopulation = add(cityPopulations); // 7053108
Our function takes two arguments: the first is invoked for every element, and the second is the initial value. In our case, the initial value is 0 (make sure to pass this to avoid NaN frustrations).
For each iteration, num will be what’s in the array—in our situation, the population of a city. With total, it will be initially 0, then whatever the previous city returned. Cool?
This is a simple example, and even this is a little trippy. My advice? Do reduce() calls until you can’t see straight, then do some some more. Pass in an array, transform into anything imaginable. Because once you master reduce, you rule the JavaScript world.
When to use map, filter, and reduce, in one sentence
Use map() when you are turning an array into another array, .filter() to turn an array into another array by filtering (or removing, most likely) elements, and reduce() to transform an array into something magical (specifically, not an array).
Understand that arrow functions aren’t just for conciseness
Starting with ES6, you can use arrow functions. Before ES6, here’s how we’d write our previous filter function:
const cities = [
  { id: 1, name: 'Chicago', state: 'IL', population: 2693976 },
  { id: 2, name: 'Houston', state: 'TX', population: 2320268 },
  { id: 3, name: 'Minneapolis', state: 'MN', population: 453403 },
  { id: 4, name: 'Madison', state: 'WI', population: 258054 },
  { id: 5, name: 'San Antonio', state: 'TX', population: 1327407 }
]

var bigCitiesOld = cities.filter(function(city) {
    return city.population > 1000000;
});
Instead, we can use an arrow function whose => offers an implicit return and make things a lot cleaner and easier. We also don’t need to manually type the function syntax. Check out this one-liner:
const bigCities = cities.filter(city => city.population > 1000000);
This is great and, for a lot of us, this completes our understanding of arrow functions. But when you made that subtle change in deleting the function syntax, you are also changing the context of this. And you definitely need to understand … this.
In short, arrow functions don’t have their own this value. When you use function() syntax, it receives a this value automatically, even when you don’t want it! As a result, before arrow functions, you’ve probably written a hack like this:
function addEverything(items) {
    var self = this;
    items.forEach(function(thing) {
        self.addAThing(thing)
    });
}
You need to do this var self = this garbage because your inner function doesn’t inherit this from the outer function—meaning this will be window or undefined if you don’t do the hack. You could also do .bind but the ugliness remains.
With arrow functions, you can just do this:
function addEverything(items) {
    items.forEach(thing => this.add(thing));
}
No hacks needed assuming you know that you’ll need to use the function() syntax for methods called using the dot operator (object.method). These functions receive this from whoever called it. For everything else, use arrow functions.
You’ll want to study Jason Orendorff’s ES6 In Depth: Arrow Functions piece until the proverbial light bulb goes off in your head.
Wrap up
In this post, we covered ways to understand JavaScript a little better. We worked through execution contexts, the event loop, async/await, array methods, and the nuances of arrow functions.
I hope you found this article useful. What are some JS pieces that boosted your confidence once you understood how they worked? Let me know in the comments!