Use OpenAPI, Swagger UI, and HttpRepl in ASP.NET Core 5 to supercharge your API development
In the latest post, we look at how easy it is to work with Swagger and HttpRepl in ASP.NET Core 5.
When developing APIs in ASP.NET Core, you’ve got many tools at your disposal. Long gone are the days when you run your app from Visual Studio and call your localhost endpoint in your browser.
Over the last several years, a lot of tools have emerged that use the OpenAPI specification—most commonly, the Swagger project. Many ASP.NET Core API developers are familiar with Swagger UI, a REST documentation tool that allows developers—either those developing it or developers consuming it—to interact with an API from a nice interface built from a project’s swagger.json file. In the .NET world, the functionality comes from the Swashbuckle library, at 80 million NuGet downloads and counting.
Additionally, I’ve been impressed by the HttpRepl project, which allows you explore your APIs from the command line. Different from utilities like curl, it allows you to explore APIs from the command-line similar to how you explore directories and files—all from a simple and lightweight interface. You can cd into your endpoints and call them quickly to achieve lightning-fast feedback. Even better, it has OpenAPI support (including the ability to perform OpenAPI validation on connect).
While these utilities are not new with ASP.NET Core 5, it’s now much easier to get started. This post will discuss these tools.
Before you get started, you should have an ASP.NET Core API ready—likely one with create-read-update-delete (CRUD) operations. Feel free to clone and use mine, if you’d prefer.
This post contains the following content.
- What’s the difference between OpenAPI and Swagger?
- Use Swagger UI with ASP.NET Core projects by default
- Use HttpRepl for a great command-line experience
- Wrap up
What’s the difference between OpenAPI and Swagger?
If you’ve heard OpenAPI and Swagger used interchangeably, you might be wondering what the difference is.
In short, OpenAPI is a specification used for documenting the capabilities of your API. Swagger is a set of tools from SmartBear (both open-source and commercial) that use the OpenAPI specification (like Swagger UI).
Use Swagger UI with ASP.NET Core projects by default
For the uninitiated, the Swashbuckle project allows you to use Swagger UI—a tool that gives you the ability to render dynamic pages that allow to describe, document, and execute your API endpoints. Here’s how mine looks.
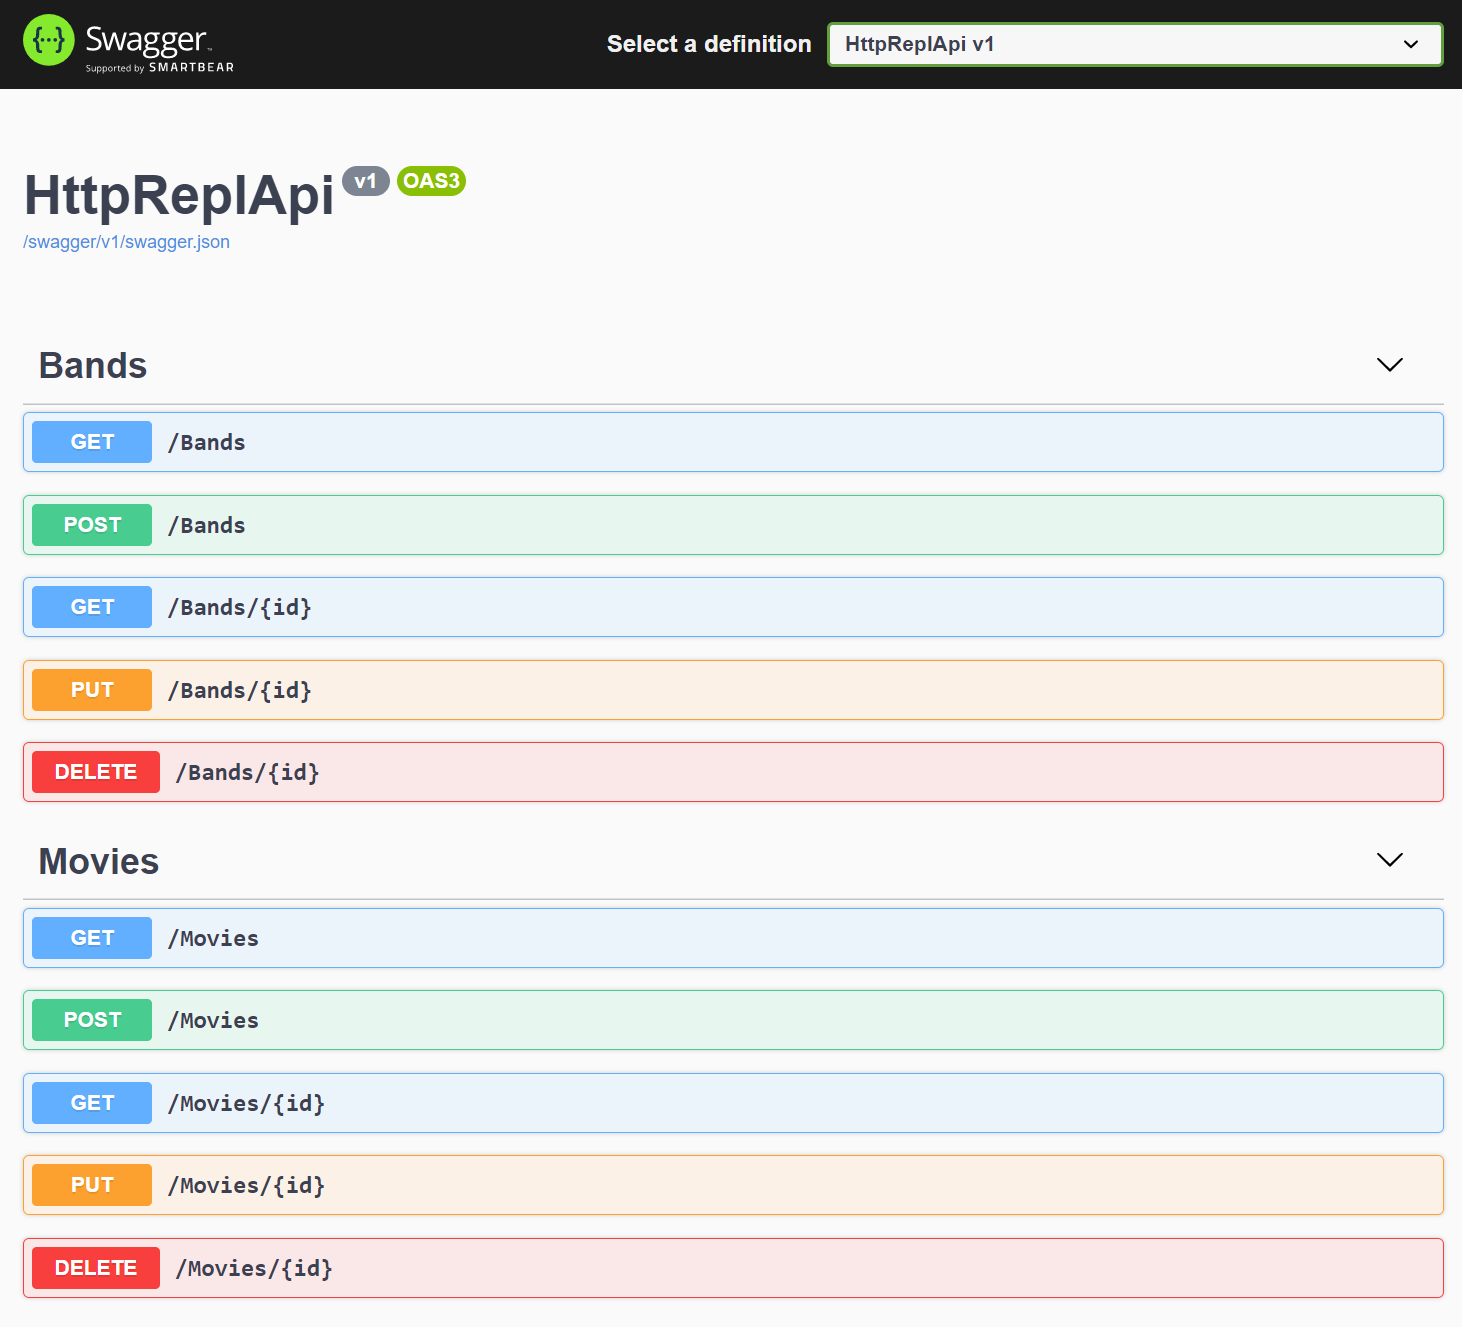
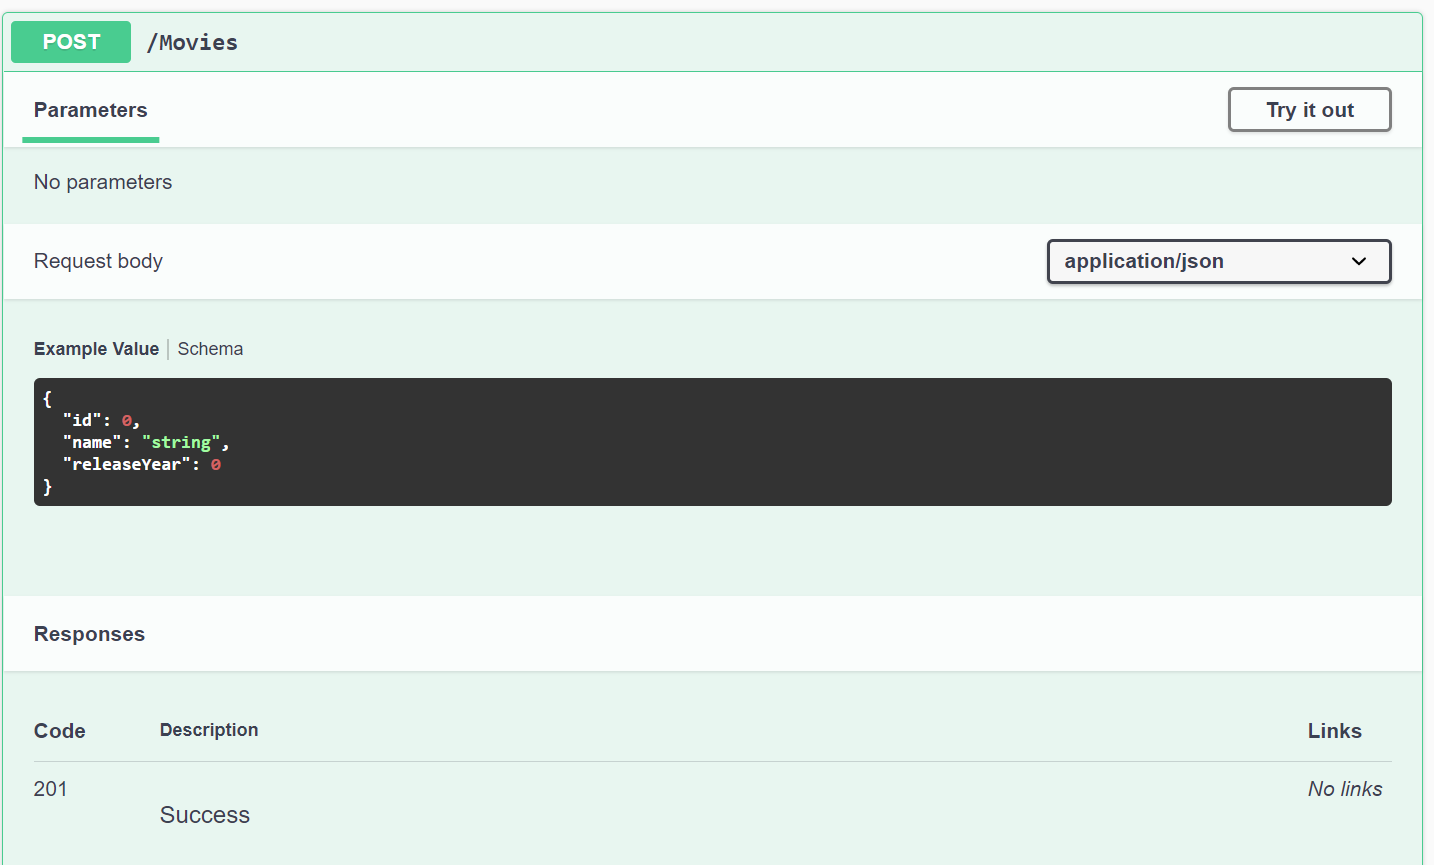
And if you look at a sample POST (or any action), you’ll see a sample schema and response codes.
In previous versions of ASP.NET Core, you had to manually download the Swashbuckle package, configure the middleware, and optionally change your launchSettings.json file. Now, with ASP.NET Core 5, that’s baked in automatically.
A big driver for the default OpenAPI support is the integration with Azure API Management. Now with OpenAPI support, the Visual Studio publishing experience offers an additional step—to automatically import APIs into Azure API Management. To the cloud!
How it’s enabled, and how you can opt out
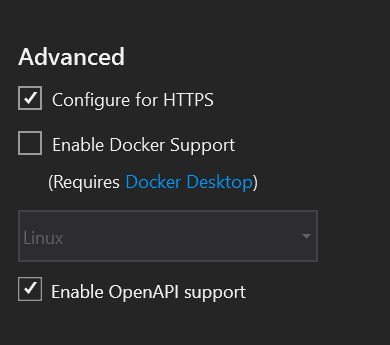
If you create an ASP.NET Core 5 Web API project, you’ll see an Enable OpenAPI support checkbox that’s enabled by default. Just deselect it if you don’t want it.
If you create API projects using dotnet new webapi it’ll be baked in, too. (To opt out from OpenAPI support here, execute dotnet new webapi --no-openapi true.)
Verify the middleware and launchSettings.json
After you create a project, we can see it’s all done for us. If you open your .csproj file, you’ll see the reference:
<ItemGroup>
    <PackageReference Include="Swashbuckle.AspNetCore" Version="5.6.3" />
</ItemGroup>
Then, in the ConfigureServices method in your Startup.cs, you’ll see your Swagger doc attributes defined and injected (this information will display at the top of your Swagger UI page). You can definitely add more to this.
public void ConfigureServices(IServiceCollection services)
{
    services.AddControllers();
    services.AddSwaggerGen(c =>
    {
        c.SwaggerDoc("v1", new OpenApiInfo { Title = "HttpReplApi", Version = "v1" });
    });
}
And, in the Configure method in that same file you see the configuration of static file middleware:
public void Configure(IApplicationBuilder app, IWebHostEnvironment env)
{
    if (env.IsDevelopment())
    {
        app.UseDeveloperExceptionPage();
        app.UseSwagger();
        app.UseSwaggerUI(c =>
        {
            c.SwaggerEndpoint("/swagger/v1/swagger.json", "HttpReplApi v1");
        });
    }

    // other services removed for brevity
}
Then, in launchSettings.json, you’ll see your project launches the Swagger UI page with the /swagger path, instead of a lonely blank page.
{
  "profiles": {
    "HttpReplApi": {
      "commandName": "Project",
      "dotnetRunMessages": "true",
      "launchBrowser": true,
      "launchUrl": "swagger",
      "applicationUrl": "https://localhost:5001;http://localhost:5000",
      "environmentVariables": {
        "ASPNETCORE_ENVIRONMENT": "Development"
      }
    }
  }
}
Now that you’ve got this set up for you, you can go to town on documenting your API. You can add XML documentation and data annotations—two easy ways to boost your Swagger docs. For example, the Produces annotations help define the status codes to expect.
From my BandsController.cs, I use a lot of Produces annotations:
[HttpDelete("{id}")]
[ProducesResponseType(StatusCodes.Status204NoContent)]
[ProducesResponseType(StatusCodes.Status404NotFound)]
[ProducesDefaultResponseType]
public async Task<IActionResult> Delete(int id)
{
  // delete by id logic
}
I love that this is available by default, but would love to see more OpenAPI scaffolding in the templates. It might be a little opinionated, but adding some Produces annotations in the default WeatherForecast controller would allow for a better developer experience with Swagger out of the box (since it is now out of the box).
Use HttpRepl for a great command-line experience
You can use HttpRepl to test your ASP.NET Core Web APIs from the command-line quickly and easily.
Install
You install HttpRepl as a .NET Core Global Tool, by executing the following from the .NET Core CLI:
dotnet tool install -g Microsoft.dotnet-httprepl
As a global tool, you can run it from anywhere.
Basic operations
To get started, I can launch my app and connect to it from httprepl:
httprepl https://localhost:5001
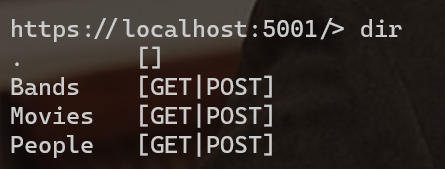
If I do an ls or dir, I can look at my endpoints:
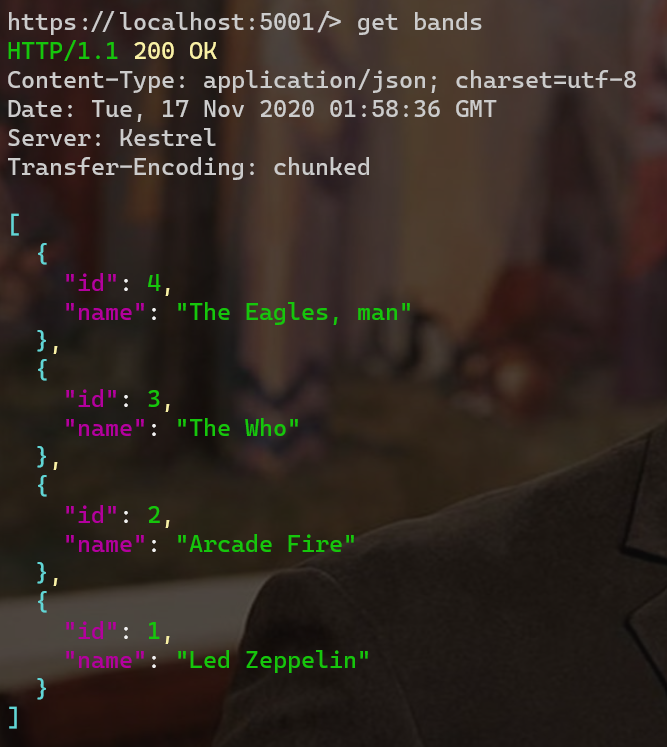
To execute a get on my /bands endpoint, I get a response payload, with headers:
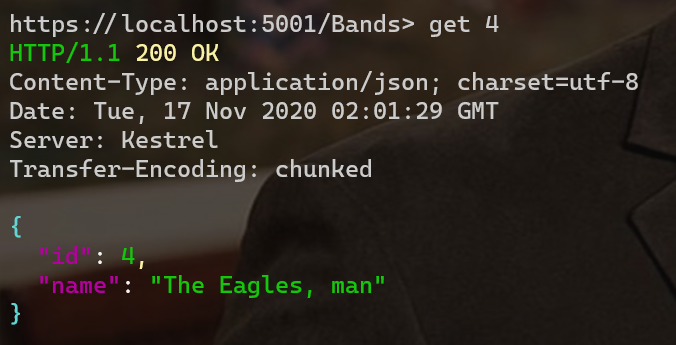
Then, I could say get {id} to get a Band by id:
Modify data with a default editor
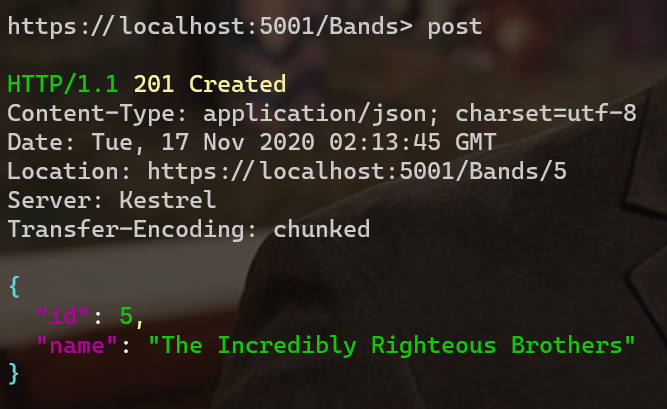
What happens when you want to update some data? You could do something like this…
post --content "{"id":2,"name":"Tool"}"
…but that’s only manageable for the simplest of scenarios. You’ll want to set up a default text editor to work with request bodies. You can construct a request, then HttpRepl will wait for you to save and close the tab or window.
In HttpRepl, you can set various preferences, including a default editor. I’m using Visual Studio Code on Windows, so would execute something like this…
pref set editor.command.default "C:\Program Files\Microsoft VS Code\Code.exe"
If using Visual Studio Code, you’ll also want to pass a `–wait flag so VS Code waits for a closed file before returning.
pref set editor.command.default.arguments "--wait"
You can also set various other preferences, like color and indentation.
Now, when you say post from your endpoint, VS Code opens a .tmp file with a default request body, then waits for you to save and close it. The POST should process successfully.
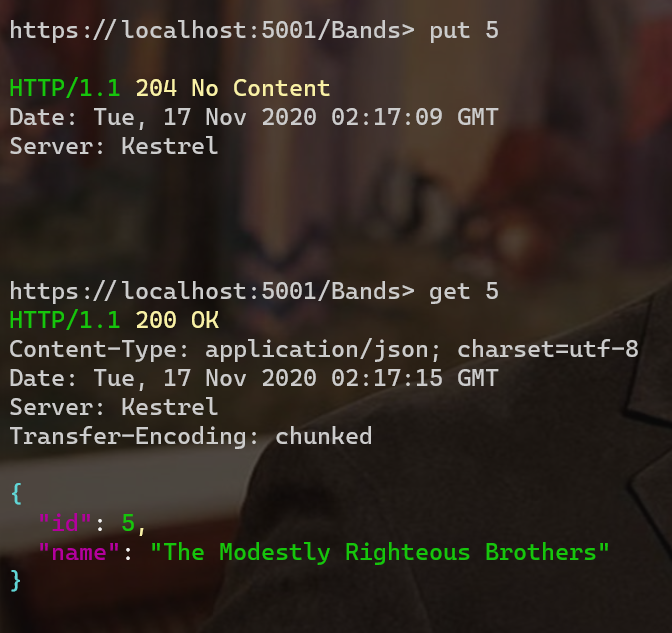
With the ID in hand, I can do the same steps to modify using put 5, then run get 5 to confirm my changes:
If I want to delete my resource, I can execute delete 5 and it’ll be gone. I tweeted a video of me cycling through the CRUD operations.
I love HttpRepl. Check it out: going through the big four HTTP verbs in just 34 seconds!
— Dave Brock (@daveabrock) November 16, 2020
This isn't a race, and your models will be much more complex obviously, but it's a good demo of how fast your API development feedback can be.
cc/ @Scott_Addie @bradygaster #dotnet pic.twitter.com/6w41j5esOk
Remove repetition with a script
If I find myself using the same test scenarios, I can throw these commands in a .txt file instead. For example, I created an api-script.txt file that I execute from the root of my httprepl session:
cd Bands
ls
get
post --content "{"id": 20, "name": "The Blue Medium Chili Peppers"}"
put 20 --content "{"id": 20, "name": "The Red Mild Chili Peppers"}"
get 20
delete 20
Then I can run it using run {path_to_script}.
Learn more about configuring HttpRepl
This is a straightforward walkthrough, but you can do a whole lot more. I was impressed with the robust configuration options. This includes manually pointing to the OpenAPI description, verbose logging, setting preferences, configuring formatting, customizing headers and streaming, logging to a file, using additional HTTP verbs, testing secured endpoints, accessing Azure-hosted endpoints, and even configuring your tools to launch HttpRepl.
All this information can be found at the official doc, wonderfully done by our friend Scott Addie.
Wrap up
In this post, we talked about the difference between OpenAPI and Swagger, using Swagger UI by default in your ASP.NET Core Web API projects, and how to use the HttpRepl tool.
As always, let me know your experience with these tools.